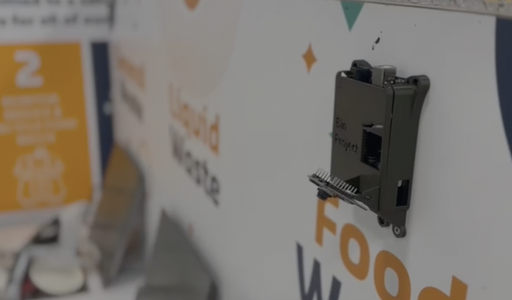
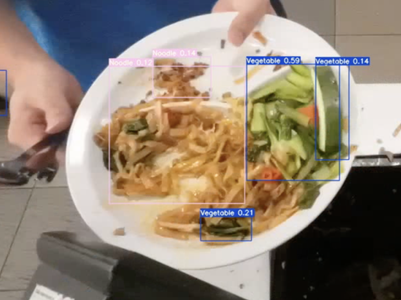
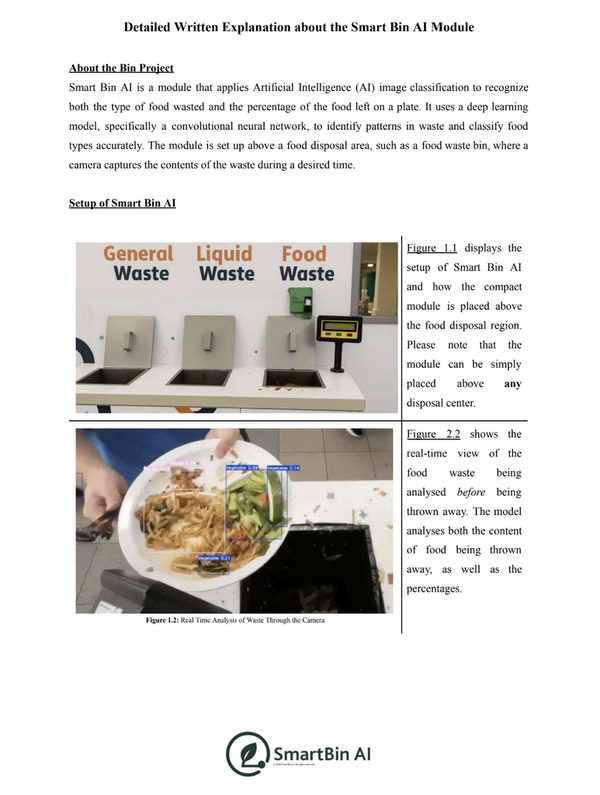
스마트 빈 AI는 인공지능(AI) 이미지 분류를 적용하여 음식물 쓰레기의 종류와 접시에 남아 있는 음식의 비율을 인식하는 모듈입니다. 이 모듈은 폐기물의 패턴을 식별하고 음식 종류를 정확하게 분류하기 위해 심층 학습 모델, 특히 합성곱 신경망을 사용합니다. 이 모듈은 음식물 쓰레기 통과 같은 음식 폐기물 처리 구역 위에 설치되어 있으며, 카메라가 원하는 시간 동안 폐기물의 내용을 캡처합니다.
학교 식당에서 점심을 먹고 있을 때, 많은 사람들이 엄청난 양의 음식을 버리는 것을 보았습니다. 학생들이 이렇게 많은 음식을 버리는 것이 매우 이상하게 느껴졌고, 아마도 어떤 특정 요리가 제대로 만들어지지 않아 음식이 낭비되는 경향이 있는지 궁금했습니다. 이 문제를 파악한 후, 저는 스마트 빈 AI를 만들기로 결심했습니다. 음식 쓰레기를 줄이기 위한 완벽한 도구입니다.
이 프로젝트는 우리 캠퍼스의 IT 인프라 책임자와 함께 승인 및 설치되었으며, 프로젝트의 진행 상황을 언급하며 대학장으로부터 인정을 받았습니다. 게다가, 저는 현재 우리나라의 3개 위치에 이 모듈을 출시했으며, 거의 두 배에 달하는 국제 설치에 대해 논의 중입니다.
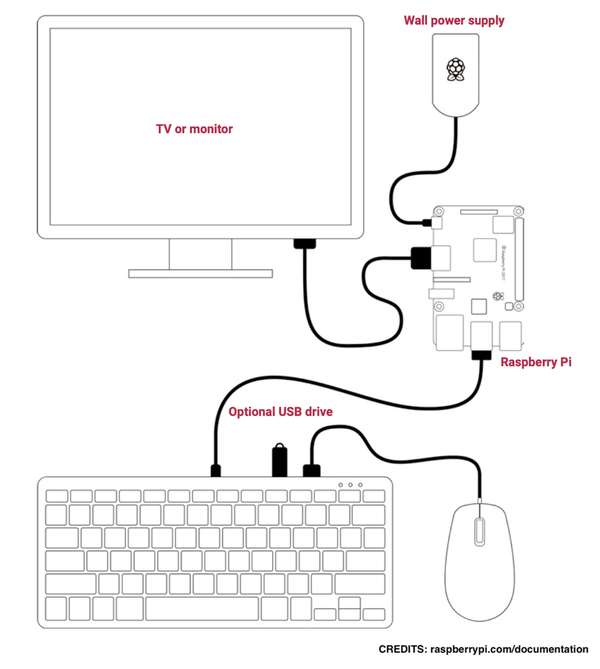
Raspberry Pi는 본질적으로 사양이 낮은 컴퓨터이지만 여전히 컴퓨터와 같은 방식으로 작동합니다. 여전히 모니터/스크린과 입력 명령(키보드 및 마우스)이 필요합니다.
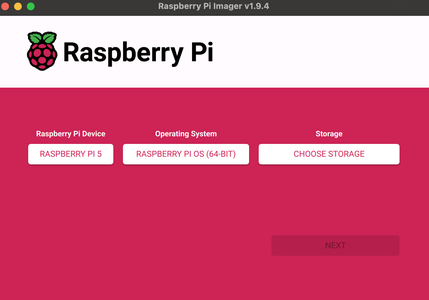
이를 제대로 구성하려면 키보드와 마우스를 USB 3.0(파란색 포트)을 통해 Raspberry Pi에 연결하세요. 그 후, 마이크로 HDMI 케이블을 Raspberry Pi에 연결하고 HDMI 쪽을 모니터에 연결하세요. Raspberry Pi의 전원을 켜고 몇 초 기다리면 설정 페이지에 도착합니다.
이 페이지에서는 Raspberry Pi 사용자 이름과 비밀번호, Wi-Fi SSID 및 비밀번호, 위치 및 언어 설정과 같은 관리자 정보를 입력하라는 메시지가 표시됩니다. 이 정보를 입력하세요!
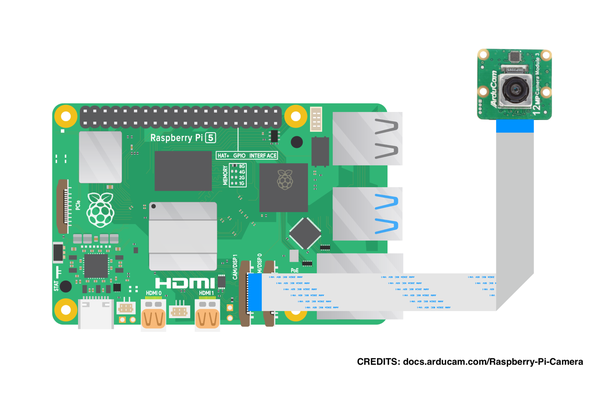
검은색 플라스틱 부분을 부드럽게 위로 당겨 Raspberry Pi 5 카메라 포트를 엽니다. 느슨해지면 카메라 케이블의 작은 끝을 Raspberry Pi에 삽입합니다. 그런 다음 검은색 플라스틱을 같은 틈으로 다시 밀어 넣습니다.
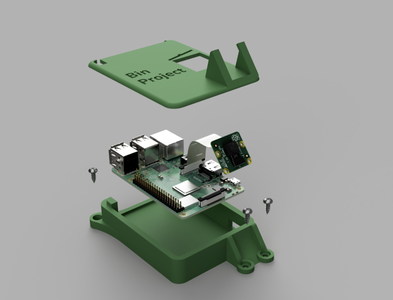
케이스의 3D 렌더링을 보려면 위의 케이스를 확인하세요. 프로젝트에 적용할 수 있는 변경 사항을 시각화하는 데도 도움이 됩니다.
3D 프린트를 인쇄 후 베드에서 제거할 때는 반드시 5분 동안 기다려서 판이 식도록 하세요. 이렇게 하면 화상과 같은 가능한 위험을 방지할 수 있습니다.
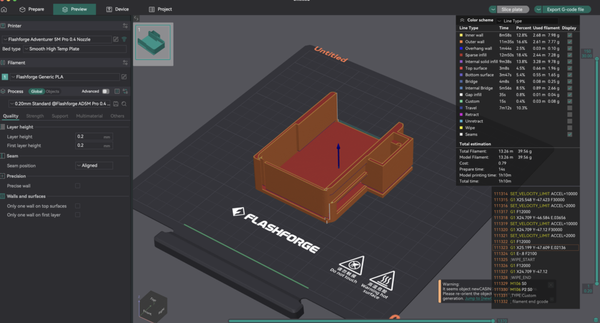
제가 Supporting Files 섹션에 추가한 모든 .STL 파일을 다운로드하여 Orca 또는 FlashPrint와 같은 슬라이서 도구에 넣으세요. 이 경우, 파일의 내부 채우기를 사용자 정의할 수 있는 Orca를 추천합니다. 즉, 나사 부분 주변은 100%로 설정하고 다른 곳은 낮출 수 있습니다. 모든 곳을 100%로 설정하는 것은 모듈을 매우 무겁게 만들기 때문에 추천하지 않습니다.
제가 Orca에서 이 설정을 구성한 이미지를 확인하세요.
인쇄가 완료된 후에는 모든 지지대를 제거하는 것을 잊지 마세요.
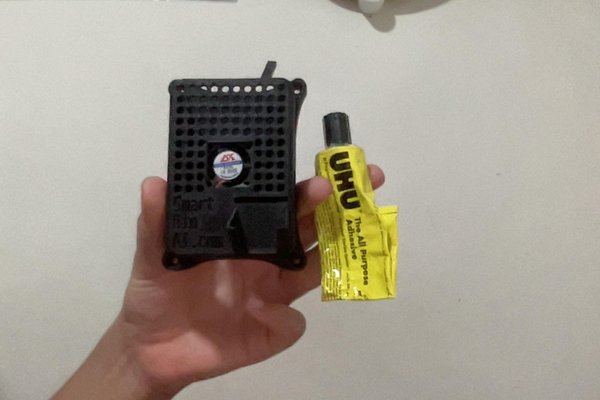
UHU 접착제를 사용하여 부품을 함께 붙입니다. 먼저 케이스의 상단을 하단에 붙이는 것부터 시작하세요. 클램프가 있다면 이때 사용하는 것이 좋습니다. 그렇지 않으면 클립도 잘 작동합니다.
다음으로, 같은 접착제를 사용하여 케이스를 마운트에 붙입니다. 여기서는 클램프를 사용하지 않았지만, 접착제가 단단히 고정될 수 있는 매우 큰 표면적이 있었습니다. UHU는 30분 후에 굳기 시작하지만, 강한 접착력을 위해 하룻밤 두었습니다.
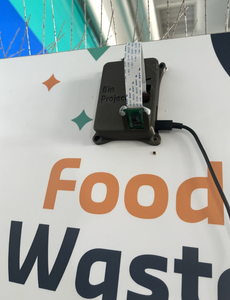
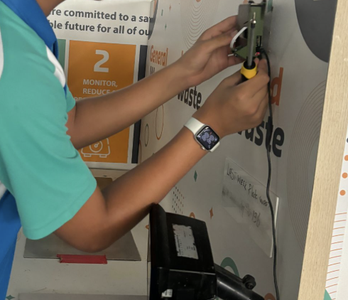
모듈 설치는 매우 간단합니다. 음식물 쓰레기통 위에 모듈을 놓기만 하면 됩니다! 떨어지지 않도록 지정된 구멍에 2-4개의 나사를 고정하는 것을 잊지 마세요!
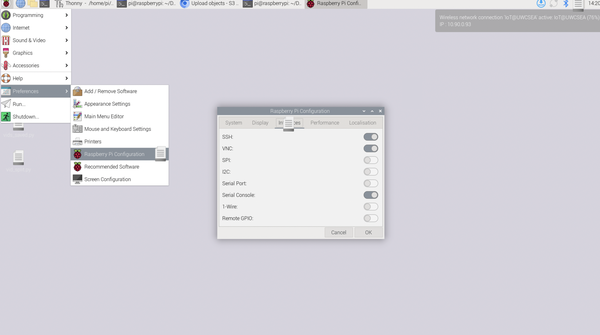
현재 Raspberry Pi에 연결하려면 모니터, 키보드, 마우스를 설정해야 하므로 상당히 번거롭습니다. VNC라는 도구를 사용하는 등 더 간단한 방법도 있습니다. VNC를 사용하면 모니터, 키보드, 마우스 없이 Raspberry Pi에 접속할 수 있으며, 전원만 있으면 됩니다.
VNC를 활성화한 후에는 Raspberry Pi의 IP 주소를 확인해야 합니다. Raspberry Pi의 UI에서 확인하거나 IP 스캐너를 사용할 수 있습니다. UI에서 확인하려면 Wi-Fi 로고 위로 커서를 가져가면 IP 주소가 표시됩니다. 해당 숫자를 컴퓨터의 RealVNC에 입력하고 사용자 이름과 비밀번호를 입력하면 헤드리스 설정을 통해 Raspberry Pi를 완전히 제어할 수 있습니다. IP 스캐너를 사용하려면 IP 주소를 검색한 후 해당 숫자를 RealVNC에 입력합니다.
먼저 분석할 사진을 수집해야 합니다. 이를 위해 다양한 음식물 쓰레기 사진을 약 3,000장 준비하는 것을 권장합니다. 다음으로 분석을 수행하는 데 도움이 되는 아래 코드를 사용하세요! 이 코드는 AI 모델을 사용하여 분석합니다 .
from openai import OpenAI
import os
import base64
import json
from PIL import Image
from io import BytesIO
import re
import tkinter as tk
from tkinter import ttk, messagebox
import matplotlib.pyplot as plt
from matplotlib.backends.backend_tkagg import FigureCanvasTkAgg
import numpy as np
client = OpenAI(api_key="")
def open_file(file_path, max_width=800, max_height=600):
with Image.open(file_path) as img:
if img.mode not in ("RGB", "L"):
img = img.convert("RGB")
img.thumbnail((max_width, max_height))
buffer = BytesIO()
img.save(buffer, format="JPEG", quality=85)
buffer.seek(0)
return "data:image/jpeg;base64," + base64.b64encode(buffer.read()).decode("utf-8")
def open_images_base64(folder_path):
images = []
valid_image_extensions = ['.jpg', '.jpeg', '.png', '.gif', '.bmp']
for filename in os.listdir(folder_path):
image_path = os.path.join(folder_path, filename)
if os.path.isfile(image_path) and any(image_path.lower().endswith(ext) for ext in valid_image_extensions):
images.append(open_file(image_path))
return images
def plot_food_waste_bar(json_path):
import matplotlib.pyplot as plt
import numpy as np
plt.switch_backend('macosx')
with open(json_path, 'r') as f:
data = json.load(f)
totals: dict[str, float] = {}
for result in data.get("analysis_results", []):
for plate in result.get("plates", []):
for item in plate:
name = item.get("name", "").strip()
qty = float(item.get("quantity", 0))
if name.upper() == "EMPTY":
continue
totals[name] = totals.get(name, 0) + qty
if not totals:
print("No food data found – totals dictionary is empty.")
return
total_waste = sum(totals.values())
percentages: dict[str, float] = {k: (v / total_waste) * 100 for k, v in totals.items()}
most_wasted = max(percentages, key=lambda k: percentages[k])
most_wasted_pct = percentages[most_wasted]
print(f"Most-wasted food: {most_wasted} – {most_wasted_pct:.2f}% of total waste")
foods = list(percentages.keys())
values = list(percentages.values())
colors = ["red" if f == most_wasted else "blue" for f in foods]
plt.figure(figsize=(12, 6))
bars = plt.bar(foods, values, color=colors)
plt.xlabel('Food Type')
plt.ylabel('Waste Percentage (%)')
plt.title('Food Waste Percentage by Type')
plt.xticks(rotation=45, ha='right')
plt.tight_layout()
for bar, food, pct in zip(bars, foods, values):
if food == most_wasted:
plt.text(bar.get_x() + bar.get_width()/2, bar.get_height(), f'{pct:.2f}%',
ha='center', va='bottom', color='red', fontweight='bold')
else:
plt.text(bar.get_x() + bar.get_width()/2, bar.get_height(), f'{pct:.2f}%',
ha='center', va='bottom', color='black', fontsize=8)
plt.show()
class FoodWasteAnalyzer:
def __init__(self, root):
self.root = root
self.root.title("SmartBin AI - Food Waste Analysis")
self.root.state('zoomed')
style = ttk.Style()
style.theme_use('clam')
main_frame = ttk.Frame(root, padding="20")
main_frame.grid(row=0, column=0, sticky="nsew")
root.columnconfigure(0, weight=1)
root.rowconfigure(0, weight=1)
main_frame.columnconfigure(0, weight=1)
main_frame.rowconfigure(3, weight=1)
title_label = ttk.Label(main_frame, text="SmartBin AI - Food Waste Analysis System",
font=('Arial', 20, 'bold'))
title_label.grid(row=0, column=0, pady=(0, 30))
week_frame = ttk.Frame(main_frame)
week_frame.grid(row=1, column=0, pady=(0, 20))
week_frame.columnconfigure(1, weight=1)
ttk.Label(week_frame, text="Select Week:", font=('Arial', 12)).grid(row=0, column=0, padx=(0, 10))
self.week_var = tk.StringVar()
self.week_dropdown = ttk.Combobox(week_frame, textvariable=self.week_var,
font=('Arial', 12), state="readonly", width=20)
self.week_dropdown.grid(row=0, column=1, sticky="ew")
self.populate_week_dropdown()
button_frame = ttk.Frame(main_frame)
button_frame.grid(row=2, column=0, pady=(0, 30))
button_frame.columnconfigure(0, weight=1)
button_frame.columnconfigure(1, weight=1)
self.capture_button = ttk.Button(button_frame, text="Capture Images",
command=self.capture_images,
style='Large.TButton')
self.capture_button.grid(row=0, column=0, padx=(0, 20), sticky="ew")
self.analyze_button = ttk.Button(button_frame, text="Analyse Images, via JSON",
command=self.analyze_food_waste,
style='Large.TButton')
self.analyze_button.grid(row=0, column=1, padx=(20, 0), sticky="ew")
style.configure('Large.TButton', font=('Arial', 14, 'bold'), padding=20)
self.results_frame = ttk.LabelFrame(main_frame, text="Analysis Results", padding="15")
self.results_frame.grid(row=3, column=0, sticky="nsew")
self.results_frame.columnconfigure(0, weight=1)
self.results_frame.rowconfigure(1, weight=1)
self.status_label = ttk.Label(self.results_frame, text="Select a week and click 'Analyse Images, via JSON' to start analysis",
font=('Arial', 12))
self.status_label.grid(row=0, column=0, pady=(0, 15))
self.canvas_frame = ttk.Frame(self.results_frame)
self.canvas_frame.grid(row=1, column=0, sticky="nsew")
self.canvas_frame.columnconfigure(0, weight=1)
self.canvas_frame.rowconfigure(0, weight=1)
self.canvas = None
def populate_week_dropdown(self):
try:
if os.path.exists('Images'):
week_folders = []
for item in os.listdir('Images'):
item_path = os.path.join('Images', item)
if os.path.isdir(item_path) and item.startswith('Week'):
week_folders.append(item)
week_folders.sort()
self.week_dropdown['values'] = week_folders
if week_folders:
self.week_dropdown.set(week_folders[0])
else:
self.week_dropdown.set("No week folders found")
else:
self.week_dropdown.set("Images folder not found")
except Exception as e:
self.week_dropdown.set("Error loading weeks")
def capture_images(self):
messagebox.showinfo("Info", "Capture Images functionality will be implemented in the future.")
def analyze_food_waste(self):
try:
selected_week = self.week_var.get()
if not selected_week or selected_week == "No week folders found" or selected_week == "Images folder not found" or selected_week == "Error loading weeks":
messagebox.showerror("Error", "Please select a valid week from the dropdown!")
return
self.analyze_button.config(state='disabled')
self.status_label.config(text=f"Starting OpenAI image analysis for {selected_week}...")
self.root.update()
try:
with open('prompt.txt', 'r') as f:
PROMPT = f.read()
except FileNotFoundError:
messagebox.showerror("Error", "prompt.txt file not found!")
return
week_folder_path = os.path.join('Images', selected_week)
if not os.path.exists(week_folder_path):
messagebox.showerror("Error", f"Week folder '{selected_week}' not found!")
return
image_base64 = open_images_base64(week_folder_path)
if not image_base64:
messagebox.showerror("Error", f"No images found in {selected_week} folder!")
return
final_results = []
for i, image in enumerate(image_base64):
progress_text = f"Processing image {i + 1}/{len(image_base64)} from {selected_week}"
self.status_label.config(text=progress_text)
self.root.update()
result = analyze_image(image, PROMPT)
if result:
final_results.append(result)
final_json = {"analysis_results": final_results}
from datetime import datetime
timestamp = datetime.now().strftime("%d-%H-%M-%Y")
filename = f'JSON/JSON_{selected_week}_{timestamp}.json'
with open(filename, 'w') as f:
json.dump(final_json, f, indent=4)
self.status_label.config(text=f"Analysis complete for {selected_week}! Saved to {filename}")
self.root.update()
totals: dict[str, float] = {}
for result in final_json.get("analysis_results", []):
for plate in result.get("plates", []):
for item in plate:
name = item.get("name", "").strip()
qty = float(item.get("quantity", 0))
if name.upper() == "EMPTY":
continue
totals[name] = totals.get(name, 0) + qty
if not totals:
messagebox.showerror("Error", "No food data found in the analysis results.")
return
total_waste = sum(totals.values())
percentages: dict[str, float] = {k: (v / total_waste) * 100 for k, v in totals.items()}
most_wasted = max(percentages, key=lambda k: percentages[k])
most_wasted_pct = percentages[most_wasted]
status_text = f"{selected_week} - Most-wasted food: {most_wasted} – {most_wasted_pct:.2f}% of total waste"
self.status_label.config(text=status_text)
self.create_plot(percentages, most_wasted, selected_week)
except Exception as e:
messagebox.showerror("Error", f"An error occurred: {str(e)}")
finally:
self.analyze_button.config(state='normal')
def create_plot(self, percentages, most_wasted, selected_week):
if self.canvas:
self.canvas.get_tk_widget().destroy()
fig, ax = plt.subplots(figsize=(10, 6))
foods = list(percentages.keys())
values = list(percentages.values())
colors = ["red" if f == most_wasted else "blue" for f in foods]
bars = ax.bar(foods, values, color=colors)
ax.set_xlabel('Food Type')
ax.set_ylabel('Waste Percentage (%)')
ax.set_title(f'Food Waste Percentage by Type - {selected_week}')
plt.setp(ax.get_xticklabels(), rotation=45, ha='right')
for bar, food, pct in zip(bars, foods, values):
if food == most_wasted:
ax.text(bar.get_x() + bar.get_width()/2, bar.get_height(), f'{pct:.2f}%',
ha='center', va='bottom', color='red', fontweight='bold')
else:
ax.text(bar.get_x() + bar.get_width()/2, bar.get_height(), f'{pct:.2f}%',
ha='center', va='bottom', color='black', fontsize=8)
fig.tight_layout()
self.canvas = FigureCanvasTkAgg(fig, self.canvas_frame)
self.canvas.draw()
self.canvas.get_tk_widget().grid(row=0, column=0, sticky="nsew")
def main():
root = tk.Tk()
app = FoodWasteAnalyzer(root)
root.mainloop()
if __name__ == "__main__":
main()
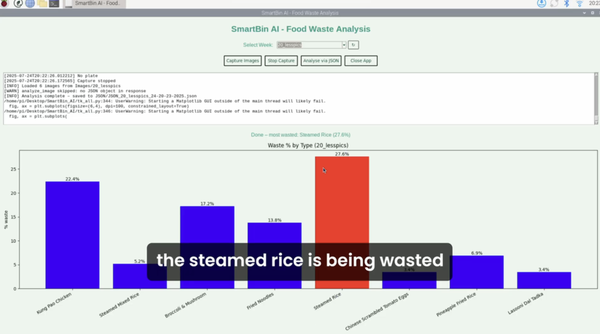
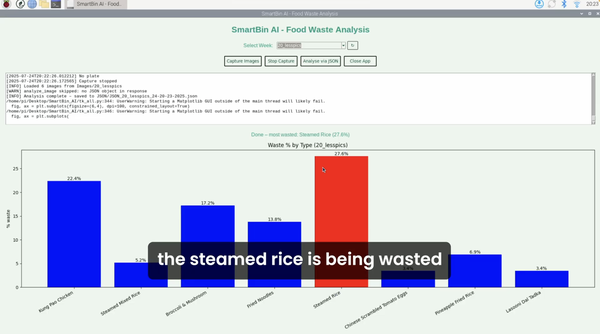
'python3 파일이름'을 입력하여 코드를 실행하세요. 여기서 파일이름은 여러분의 파일 이름입니다. 제 경우에는 main.py입니다. 여러분이 보는 분석은 첨부된 이미지와 비슷해야 합니다.
이 코드는 또한 JSON 파일로 저장되므로 정보를 저장하는 데 필요한 공간을 줄일 수 있습니다.
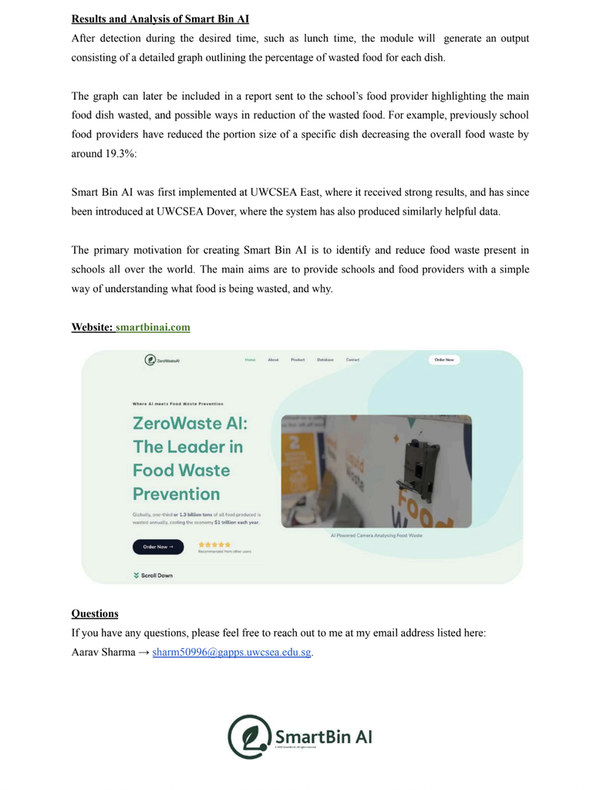
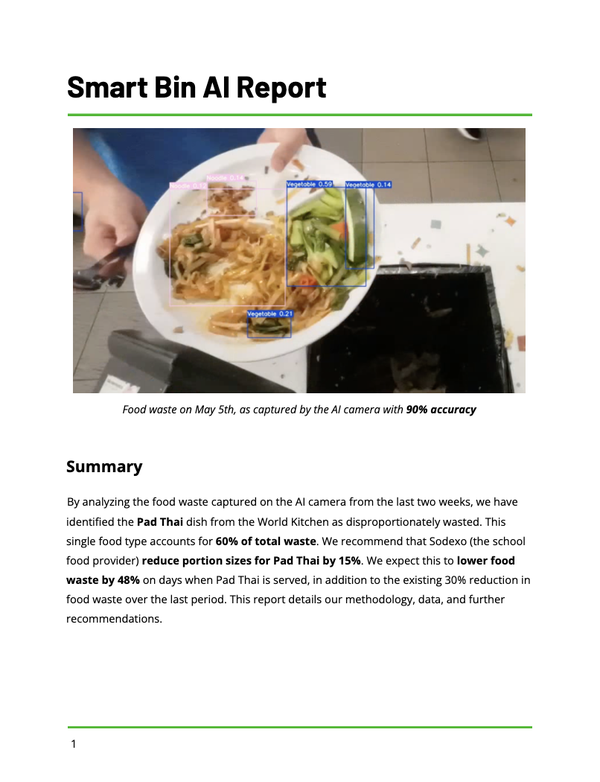
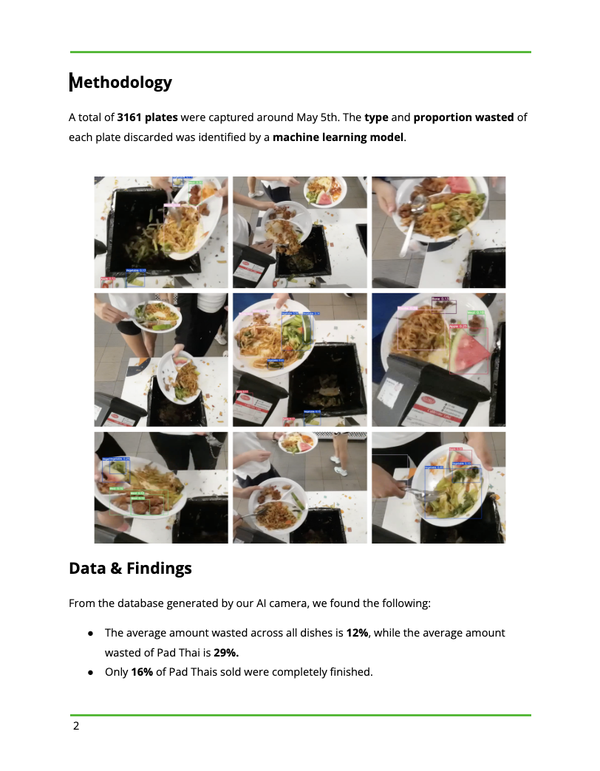
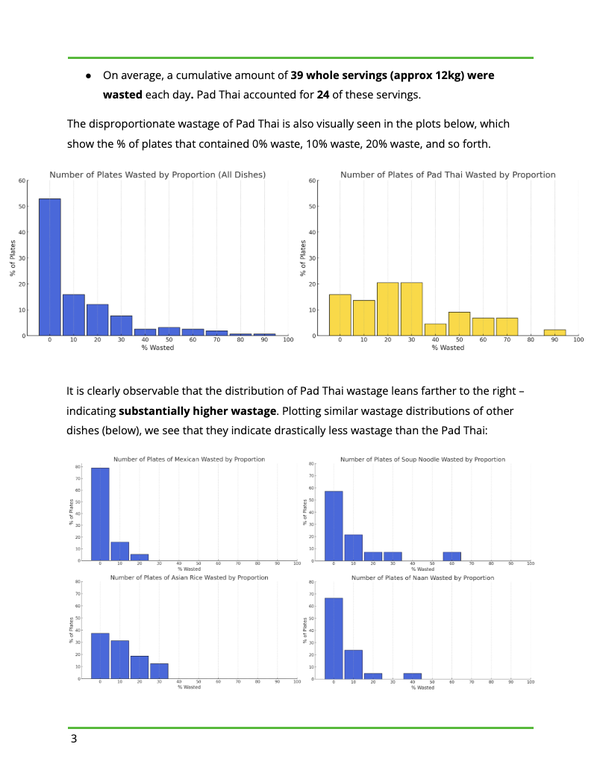
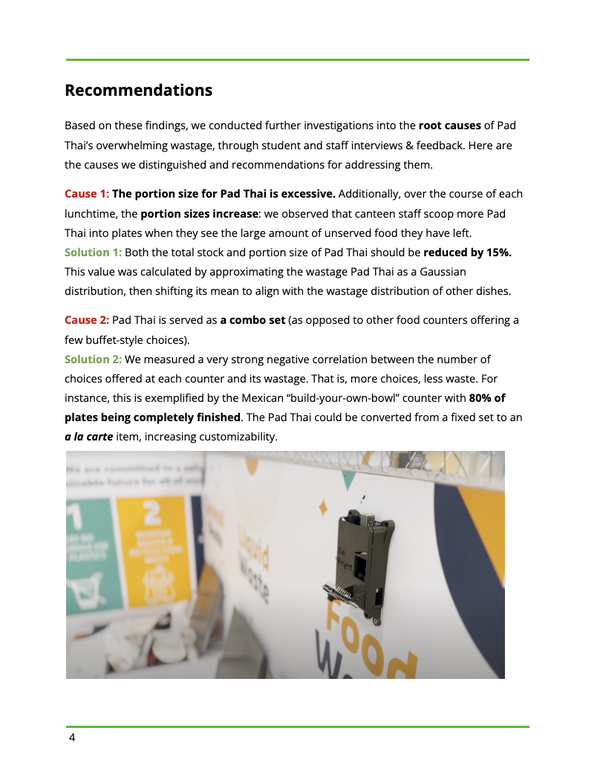
스마트 빈 AI 모듈에서 수집된 정보를 사용하여 작성된 최근 보고서의 이미지를 첨부했습니다. 이는 많은 음식 낭비를 방지한 카페테리아의 음식 공급자에게 전달된 유용한 분석입니다.


 https://www.instructables.com/Food-Waste-Reduction-Tool-Smart-Bin-AI